Wednesday, July 29, 2015

How to Redo your Coffee Table for $3

When registering for my wedding, I decided to register for a new coffee table.  I've had my current coffee table for over 5 years.  It's moved with me twice and been through two boyfriends.  I've dated smokers all of my life and people were allowed to smoke at my old house.  We also didn't have coasters at one time.  So you have a combination of water damage, cigarette ash and just general wear and tear.  I think the final straw was when I was wiping down the table and got a splinter through a Pledge wipe.

This is what my coffee table looked like


Unfortunately, I did not receive the coffee table I registered for at my Bridal Shower and I highly doubt anyone is going to buy it for me as a wedding gift.  I don't want to buy a coffee table for myself so I had to figure out some other way to fix the top of my coffee table.  The obvious way to fix it would be to sand it down and refinish it, but that just sounds like a lot of work -- a lot of work that I don't want to do.  I'd seen someone use marbled contact paper on an old kitchen table to refinish it so I tried it with my coffee table and I'm very happy with the results.

What you'll need: scissors and wood grain contact paper from the dollar store that is a similar shade as your coffee table.  I bought three rolls but ended up only using two.


First- clean off your coffee table.

Second- unroll the contact paper and lay it across your coffee table.  You'll want the first sections that you cut to be the exact same length as the coffee table.

I have no clue why this picture is at such a weird angle -- I think I was standing on my couch.
Third- make a small cut on the contact paper at the length at which you'll need to cut it.  Flip the contact paper over and you'll see that it has very convenient grid lines for cutting.


Fourth- cut the contact paper at your desired length

Fifth- cut the contact paper in half lengthwise (hot dog style).  You're going to use these pieces to cover the edges of the coffee table to the old wood finish doesn't show on the sides.


Sixth- place one of the pieces of contact paper at one side of the coffee table with about 4 inches hanging over the edge of the table.

Seventh- remove one edge of the contact paper and stick the contact paper on the edge of the coffee table.  Then slowly peel the backing off of the contact paper and use your hand to smooth the contact paper onto the table.  I didn't have a very big problem with air bubbles, but we'll discuss how to remove them later.


Eighth- repeat this step on the other side of the table.

It will then look like this


Ninth- cut a piece of contact paper that is long enough to cover the left and right edges on either side of the coffee table.

Tenth- line up the piece of contact paper with the bottom edge of the coffee table, remove part of the backing and cover the table in the same manner as above.


Eleventh- at this point, the entire top of my coffee table was covered.  If you want, you can do step 10 again on the top half of the coffee table in order to completely cover the coffee table.  OR you could cheat like I did.

A small section of the edge of your coffee table is exposed on either side:


Just cut a a small piece of contact paper the size of the exposed wood and cover the edge with it.  It's as simple as that.


When you're done, it should look like this.

Yet again -- I must have been standing on the couch for this one.
If you experience air bubbles, just take a pin and poke the bubble gently then rub it out with your finger.


Another awesome part about this is that now the table is water proof and you don't even need coasters! :)


Wednesday, July 22, 2015

It's time to get organized!

I've said it before but I'll say it again.  I'm pretty anal about things.  Everything in my house has a place and I hate clutter.  The thing is that if it's in a drawer, it's out of sight/ out of mind and I don't care what the drawers in my house look like.

This frame of mind leads to situations like this:


 This is supposed to be our menu drawer.  The problem is every time I get a pay stub or a water bill, I just throw it in the drawer.  At its worst, I couldn't find any menus and when I shut the drawer, the overflow of paperwork would fall out of the back of the drawer and end up on top of my pots and pans in the cupboard below.

Eventually, I reached my breaking point.  I wanted a small filing cabinet because we don't have a lot of space in our house but even a cheap one is like $40 for like one little cube unit.  We are not made of money -- we're paying for a wedding but we really needed to get everything organized.


 I found a crate made for hanging folders at Staples and then bought a pack of hanging file folders.  All together it cost around $14 which is way more affordable.


Then began the tedious task of going through every piece of mail and paperwork.  For this, I suggest using a large table or even the floor because I didn't realize how many different categories of paperwork I had: car insurance, medical insurance, cable bill, water bill gas bill, wedding stuff, student loans and various other forms of paperwork.  Now, I've changed a lot of my stuff over to just getting paperless billing, but I still have a ton of paperwork.

This is all of the envelopes and useless papers that were in the drawer, but didn't need to be:

FYI -- I did look at all of this paperwork to make sure that there was nothing on it that could be used to steal my identity before I took the position.
After everything was sorted out, I started labeling my folders accordingly and putting all of the paperwork in there.  Now my life is much simpler.  Any time I get a bill or a piece of paperwork, I just put slip it in the folder just like I do at work.


And now I can find the menus that I'm looking for


Wednesday, July 15, 2015

Bridal Shower Part 3: Fun and Games

So you're planning a bridal shower.  You've got your venue, you've got your food, your drinks, your decorations and your favors.  Obviously you're going to eat and open presents but how are you going to keep your guests amused for the rest of the time.  Also, at this point, shower guests expect something -- some kind of activity, contest or drawing.  

Personally, I'm not a fan of traditional shower games.  This is probably the main reason why I planned my own shower.  When I go to showers, I don't want to make wedding dresses out of toilet paper, I don't want to have to think and do a word scramble and I definitely don't want to do math to figure out how many minutes there are until the wedding.  That being said, I wanted to make sure that my shower games were relaxed and simple.

As you recall from my last post, there were white envelopes and pens on the tables.  The envelopes were from the Thank You cards that I would soon be writing.  (Since it was such a hot and sticky day, some of the envelopes became stuck shut and I had to steam them open to put the thank you card in).  Each person at the shower wrote their mailing address on the envelope and then put it in a basket.  During cake, I drew three envelopes.  The first two winners got small collage frames with $20 Shutterfly gift cards.  The gift cards came with dress orders from David's Bridal and I ordered a couple of collage frames from Amazon.com.  

The third winner received a Movie Night Popcorn Bucket filled with popcorn, candy and three DVDs.  I picked Jane Austen classics: Pride and Prejudice, Mansfield Park and Emma.  I was going to add a bottle of wine, but I had that bucked packed with snacks.  There were red vines, snow caps, bunch a crunch and more.  Most of the items I picked up at the Dollar Tree except for the movies.

My bench filled with all the goodies as well as a notebook for writing down who gave what gifts and the baskets to put things in.
The last set of prizes were scented hand soaps from Kohl's.  They were mainly purchased with coupons and $10 Kohl's Cash so that they were essentially free.  The little lady bug in the basket with the soaps is an egg timer.  As my fiance and I opened presents, we'd set the egg timer and whoever's present we were on when the timer went off would get a soap.  A good amount a time to set the timer is about 1 minute and 30 seconds to 2 minutes, but it really depends on how many gifts/ people you have.  I bought 12 hand soaps for 35 people.  The egg timer was cute but it wasn't working.  At a certain point, we had to use the timer on a phone because the timer wouldn't go off.  So I suggest just using someone's phone to begin with.

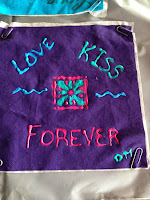
In between lunch and opening presents, we had an activity for the shower guests to do if they so chose.  We cut 8" quilt squares out of three different colors of fabric (we also bought coordinating fabric for the back of the quilt).  Then we paper clipped wax paper to the back of  the quilt squares so that the fabric paint or markers would not bleed through onto the table.  We bought paint markers and puff paint as well as rubber stamps and stencils for those who weren't artistically inclined and placed them all in baskets on a table where everyone could decorate them.  We also included, paper plates, small sponge brushes and Lysol wipes to make things easier on them.

Everyone seemed to have a good time decorating although, if you choose to do this activity, be sure to tell your shower guest to leave at least a 1/4" seam allowance.  Once of my bridesmaids who couldn't make it to the shower and her wife are going to assemble the squares for me.  I also saved a 16"x16" square in one of the colors to put my new last initial on.  It will be the center of the quilt.


 They take a few days to dry and anything in paint marker needs to be set with an iron after it dries.  Also, not everyone wants to decorate a square so my artistically inclined sister decorated some additional ones so we'd have a good amount on the quilt.

You may be wondering about the potted plants we used as centerpieces that I talked about in last week's post.  We used those as prizes as well.  There was one at each table so whoever had been in the longest relationship at each table got to take the centerpiece home.  Any leftover plants went to whoever wanted them.

And that was the end of the shower.  I kept the tablecloths and whatever was left of the plates and napkins to use for my rehearsal dinner.  Despite the hot stickiness and the rain, it was a good day and we had a lot of fun.  I hope these post help you with your shower ideas.

Wednesday, July 8, 2015

Bridal Shower Part 2: Favors and Decorations

When you're planning a bridal shower, food and drink is probably the most important thing (see last week's post), but after that, you need a little bit of ambiance.  I'm a simple person.  I really didn't want to over do it for my shower especially since I was basically planning it on my own.  Most of the decorations were essentially table covers and some simple centerpieces.

My wedding colors are plum, mercury (which is a medium gray) with pops of a bright blue.  When one of my bridesmaids and I went to Party City, there weren't any colors that matched exactly so we went with pale versions of my colors.  Not to mention we found these adorable plates and napkins:

partycity.com
This became the jumping off point for the color scheme: silver table cloths and light purple plastic cups and plastic flatware.  We also got light purple tissue paper for our centerpieces which I'll talk about in a second.  Later I went to the Dollar Tree and bought some white table cloths for the food tables and the benches of the picnic table we used.

The centerpieces were small potted plants that we wrapped in light purple tissue paper.  Make sure you keep them in a dry place the night before the shower -- they shouldn't wilt and that way the tissue paper won't fall apart.  We used rubber bands to hold the tissue paper up.  You can buy a huge bag of rubber bands from the Dollar Tree and they're all different colors.  We used mostly white ones.  Unfortunately since it was rainy the morning of the shower and we kept the plants outside under a canopy, the pots were still wet.  I wiped them off, but it was no use so I put a layer of paper towel inside the tissue paper to try and prevent the tissue paper from getting wet.  The operative word in that sentence is try.  It still worked out.

As for my favors, I wanted something simple and edible.  There's nothing worse than going home with a favor from a wedding shower that is completely useless and throwing it in a drawer or closet (the same goes with a wedding for that matter).  So I chose Lindor Truffles in a favor box.  

Do yourself a favor and go to lindt.com.  Seriously -- you can make your own variety pack of Lindor Truffles with any flavor you want -- it's dangerous.  I chose milk chocolate, peanut butter, citrus, sea salt, raspberry, white chocolate, cappuccino and coffee.


I bought some favor boxes with heart cut outs on Amazon and filled 40 of them with four truffles each.  The boxes were 2"x2"x2" so it was a tight squeeze to fit 4.  


In order to get all 4 in, I put two truffles on the bottom layer in opposite corners and then on the top layer, I put two truffles in the remaining two corners.

Step 1
Step 2


The final product looks like this:


I may not look amazing from the front, but believe me, no one is looking at it for very long before cracking it open and enjoying those delicious chocolates.

This is what the final set up looked like on the day of the shower:

Please excuse my finger in this shot.  I was in a rush to take a picture and get ready for the party.

Now, you may be asking yourself, "Why are there pens on the table and what are the white things underneath the favor boxes?"  Well, I guess you'll just have to read next week's post on Bridal Shower Fun and Games to see the answers to that.

Wednesday, July 1, 2015

Bridal Shower Part 1: Food and Drink

My Bridal Shower was a couple of weeks ago and I've been so busy, I haven't had time to blog about it.  I don't want to say that I'm anal, but I know what I want and I'd rather do things myself so I know that things are done right.  So I basically planned my entire shower.  It should also be said that two out of four of my bridesmaids live out of state and wouldn't be able to make it to the shower or help out.  Also, I had originally told everyone my shower would be June 7th, but then for whatever reason, decided to change it to June 14th.  June 14th happened to be during my 3rd bridesmaid's step-daughter's class trip to Chicago so she wasn't going to be there either.  I felt bad, but I did it to myself-- that's the price you pay when you want to do it all on your own.

We had the shower at my parents' house.  They live in a nice area with a 4 car garage and they also have two large canopies that they put up for parties.  The Weather Channel was of no help the weeks before the shower.  One day it would say 72 and party cloudy, the next day 82 and rainy -- sometimes the weather forecast would change in the same day.It was very frustrating and the final forecast was in the 80s with thunder showers.  The day was extremely muggy and the sun peaked out about an hour before the shower and made it extremely hot and sweaty out.  Just before the shower, it began to pour which made it a little better.  We ended up hanging large s-hooks on the poles of the canopy so that people could hang their umbrellas to dry once they came.

Anyway, on to the food and drink portion as promised.  We expected about 35-40 people to attend the shower.  So we ordered a variety of sandwiches from the grocery store: one ham and cheese slider platter and two pita pocket platters (for people who don't like ham/pork).  In retrospect, we should have ordered two of the ham slider platters and one of the pita pocket platters.  The ham was a hit.

Kroger.com
For sides, we had potato chips, pita chips with hummus, a Caesar salad and a pickle tray.


Kroger.com

For dessert we, of course, had a cake as well as a brownie platter.  Originally I wanted to order a half sheet Costco cake, but I wanted a marble cake with buttercream frosting, but Costco doesn't do either of those things so we just had to order it from another grocery store.  It was delicious though.  I found the silhouettes on the cake by googling free clip art and then the people at the bakery improvised the air brushing.  I thought it came out pretty cool. 


 We also had a brownie platter just in case there were people who didn't want cake.
Kroger.com

As for the beverages, we had my fiance's family's punch that they make for all special occasions.  It's very simple to make: mix a can of frozen orange juice, a can of frozen lemonade, two and a half bottles of seven up and a fifth of Southern Comfort together.  Then add a jar of maraschino cherries.  It's delicious.  

We also had Raspberry Vodka Limeade Slush.  Here's a recipe http://www.thekitchn.com/quick-cocktail-raspberry-limea-59664  -- we left the vodka on the side so that any little ones could try it too,

The last alcoholic beverage we served was moscato sangria.  I just bought it in a bottle and added sliced lemons, limes and oranges.  Surprisingly enough it was not as big of a hit as I thought it would be.

With all of the alcohol being served, we, of course, served bottled water.  I'd seen an idea online where you wrap the bottles in duct tape to give them a personal touch.  We chose mustache duct tape and pink zebra stripe.  Originally I was cutting the labels off of the water bottles and wrapping them in duct tape but then I felt it was just tedious and time consuming.  Duct tape isn't transparent anyway and it was thick enough to cover the water bottle labels so I just stopped cutting the labels off.


And that's about all we, well I, did for food and drink for the shower.  You do, of course, need ice to keep everything cool.

Next week will be all about favors and decorations. :-)